
How to grow Violas
Violas are gorgeous and cheery plants that can be grown throughout the year, brightening up a winter container or adding much-needed colour in early spring. Violas are widespread in popularity and are generally thought to have originated in France, Spain, China and parts of Asia, with a preference for Alpine areas. The Latin name is Viola and includes a large number of varieties of plants. Commonly known as ‘Heartsease’, Violas were said to have been used in love potions.
The Viola is an adaptable low growing bedding plant coming in both classic and trailing varieties and is a welcome addition to hanging baskets. Violas complement a variety of garden styles, whether in pots in patios, courtyards or cottage gardens.
Alongside Rose or Lavender, Violas are edible and look lovely in salads, as a garnish or in a dessert. Edible Viola flowers have been part of all sorts of world cuisines and eaten regularly in other countries since ancient history.
Viola plants are readily available to buy in garden centres and nurseries throughout the year and come in a variety of colours.
Types of Violas to grow
Within the Violaceae family, Violas have the largest number of varieties/species at somewhere between 525 and 600. Pansies (Viola x wittrockiana) are considered to be the larger version of the Viola, sharing very similar flower shapes and colours.
The best Violas to use for edible flowers are:
- Viola tricolor
- Viola x williamsiana
- Viola odorata
- Viola cornuta
Viola flowers are best eaten when they are freshest, but can be stored in an airtight container in the fridge and used over a couple of days.
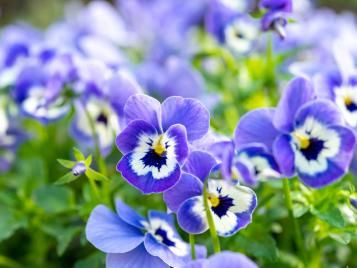
Gardeners are spoilt for choice when it comes to varieties of Viola to plant. With so many colour options, there’s sure to be one that complements your chosen colour scheme.
Some of the most popular varieties include:
- Viola ‘Sorbet Ruby Gold Babyface’ - a striking combination of dark maroon/purple with a yellow inner.
- Viola ‘Sorbet Marina’ - is one of the soft colour combinations of pale lilac outer petals, white in the centre with contrasting dark purple and yellow in the centre.
- Viola ‘Johnny Jump Up’ - one of the most well-recognised varieties, also known as Viola Tricolor. With purple, yellow and white petals these are a very bonnie upright variety.
- Viola odorata - also called ‘Sweet Violet’ thanks to its fragrance. A slightly smaller flower, but with the benefit of a sweet smell.
- Viola ‘Sorbet Delft Blue’ - pretty pale lilac/blue and white petals with a yellow centre.
What you’ll need to grow Violas
Violas are an easy growing annual or perennial, perfect for beginners to enjoy planting and caring for.
To grow Violas from seed, you will need:
- Small pots or covered seed trays to start your seeds off in.
- Peat-free multi-purpose compost or seed compost. If you’re growing in pots, it’s better to use multi-purpose compost straight off as there will be enough nutrients to sustain the seedling once growing.
- Watering can for light watering in seed trays.
- Liquid feed - particularly for container gardening.
You may only need to do one batch of seed sowing as Violas can self-seed, treating you to a bigger display next year.

Where to plant and place your Violas
Sowing from seed
The best time to start sowing your spring Viola seeds in small pots/seed trays is around late January to March and plant out in spring.
Violas take about eight to 12 weeks to germinate.
Violas can stand cold weather but if they’re very new plants, you may need to cover them if snow is expected!
- Choose enough small pots for the number of seeds you’re sowing - you don’t need to sow all your seeds in one go if you only need a few plants. Fill with peat-free compost to near the top and read the seed packet to check how deep they should be sown - sow two or three per pot. If using seed trays, place a couple of seeds per cell and follow the same instructions as pots.
- Once the seeds are in, cover with your compost and water lightly. Violas are a seed that needs the dark to germinate so cover your chosen containers with an opaque plastic bag for example.
- Place the pots/seed trays somewhere warm and lightly water the seeds until you see them germinating. At this point, remove the cover so they can have the light.
- Move the seedlings to a sunny spot once the seedlings appear. When the first true leaves appear, weed out (or thin out) the weaker seedlings, leaving the strongest and healthiest in the pot. If you have grown your Viola plants in a seed tray, now is the time to translate to small pots using peat-free multi-purpose compost.
- When the plants are bigger and it’s getting near the time to plant out, it’s important to harden off the seedlings by leaving them outside in the day and bringing them in at night – do this over a couple of weeks. Ideally, the Viola plants shouldn’t stay outside if the weather is particularly cold.
- Once hardened off fully, you can plant out in their final spot whether in beds, pots or hanging baskets. Add some liquid feed every month and 2 times a week in summer.
How to sow Viola seeds direct in the ground
Viola seeds can also be sown directly in the ground, although this can be a little tricky if there is a particularly cold snap in early spring or autumn, as ideally they would need some warmth to germinate.
Lightly rake and spread some peat-free compost over the chosen area, sprinkle the Viola seeds thinly and then cover with your compost. Water sparingly but regularly.
If you get areas that have germinated with all the seedlings on top of each other, thin out the weaker seedlings, leaving the strongest. Keep your new seedlings moist and fed.
How to plant Violas
If you prefer to buy Viola plants for either the spring or autumn season, dig a small hole big enough for the plug plant, gently press in the Viola plant and backfill with some good quality peat-free compost.
If you’re planting Violas in pots, make sure you cover the drainage hole pots.
Keep watered, but not too wet. Depending on the weather and other growing conditions, the Viola plants may last into the next season, otherwise, pull them out when they’ve finished flowering.
If you’re planting your Violas in the ground, rather than baskets, they’re best at the front of a border as they’re low growing and are a good ground cover plant.
Caring for Violas
Violas will provide you with months of cheery flowers, but keep in mind their preferred growing conditions:
Light
Violas like a sunny spot but – taking a sign from their preferred flowering seasons of spring and autumn – they don’t like full sun or the heat of the summer sun. Ideally, plant your Violas in a spot where they’ll benefit from shade at the hottest part of the day.
Soil
Violas and their near relative Pansies, like a well-drained fertile soil.
Temperature
To germinate, Violas like a warm temperature and once planted out, enjoy the cool temperatures of spring and autumn.
Water
Violas like regular watering, but not to the point of being too wet. Ideally, the soil should dry out between waterings. Violas can manage with short water droughts, but will flower best with watering.
Feeding
If planting in the soil, add some continuous release granules at planting time and for those in pots, add a liquid feed regularly.
Repotting
If you live in an area with hot summers but want to keep your Violas for the next season, carefully dig out of their current position and transplant to a shadier spot or garden container until the hot weather has gone.
Equally, if your Violas are in pots, move the pots to a shadier area to bring them back out once the heat of the summer has finished. This is a good opportunity to cut back the Viola plants - remove any dead stems and deadhead. Violas respond well to deadheading and it is in fact an important part of Viola care. Deadheading will encourage repeat flowering.
Propagating
If you’d like to propagate Violas, it’s a good idea to choose a variety that’s specifically a perennial, for example, Etain or Rebecca varieties. It’s worth trying with the general varieties and taking care of their growing conditions – not too much sun and regular watering are important. The garden Pansy (Viola x wittrockiana) has been bred for its large colourful flower heads, rather than as a perennial so it’s better to treat this variety as an annual.
Propagating is best done in autumn by digging up the Violas and carefully pulling them apart if their roots are tangled together (known as dividing). Replant Violas in pots filled with fresh compost if you want to grow on, or in a different area of the garden to enjoy their colour.
Dividing Violas at the end of their growing season is a good way to benefit from using the plants again to colour your garden.
Cuttings
Taking a cutting from a Viola plant is another way to propagate. Taking a cutting doesn’t guarantee an exact match to the parent plant, so there may some variation in colour.
The preferred season for taking cuttings is spring when Violas naturally grow most vigorously. Or, if your plants are particularly established, late summer. For either season, take the cutting stem from a non-flowering shoot.
Cut the stem so the cutting will be about 5-7cm long, ensuring you make the cut just below a leaf joint (node). Remove any leaves from the lower half of the stem and place the stem into small pots of potting compost. Give the cuttings plenty of space so the leaves have room to grow. Place the pots in a propagator or a transparent plastic bag in a warm spot with good light, but not direct sunlight.
Once the cuttings have taken and grown big enough, plant out in either beds or pots or hanging baskets. Don’t forget to deadhead regularly to encourage repeat flowering.
Common pests and diseases with Violas
Aphids
The best natural way to defeat garden aphids is to squash them before they multiply or hope that beneficial garden insects and pollinators feed on them before they do any damage. In a worst-case scenario, try a proprietary brand plant invigorator that controls the aphids and gives the Viola plants a boost.
Slugs and snails
Like all young tender new plants that have recently been put out, slugs and snails find Violas attractive. Check on your Violas for slugs and snails regularly and use a barrier or slug pellets that do not harm other wildlife.
Viola leaf spot
A common sign of a fungal infection are black or brown spots on the leaves which then spread to other plants. In the first instance, keep an eye out for Leaf Spot when buying Violas, particularly if they’re stored in tight spaces with not enough ventilation. When watering, try and keep the leaves as dry as possible, aiming the water at the ground.
Viola black root rot (also known as pansy sickness)
If you find your Viola leaves are turning yellow, this can be a sign of Viola Black Root Rot. The plant growth also appears stunted. Root rot is caused by a fungus that attacks the roots, and the only real way to treat this disease is by taking out any plants with symptoms and improving your soil drainage before replanting. Leaving the soil for a period of time and planting new Violas in a different spot also gives time for the fungi to reduce.
Pansy downy mildew
This is most prevalent in winter varieties of Pansies and Violas that are growing in damp and cool conditions. One of the first signs are pale blotches on the underside of the leaves that spread to the flowers if not controlled. Check new plants for symptoms and move your plants to a different spot next year. Keep planting spaced out to ensure good ventilation.
Frequently asked questions about Violas
Can you grow Violas indoors?
Yes, Violas can be grown indoors. The best rooms to put Violas in are cool rooms without too much direct sunlight. These conditions mimic their preferred outdoor growing conditions. Potted Violas indoors make a lovely seasonal display.
Are Violas perennials?
Violas are perennials and annuals. If you want your Viola plants to be perennials, grow them in spot with some sun, but not too much direct sun in the summer as this dries them out. Deadhead to encourage repeat flowering and cutback/tidy up at the end of their season. Established Violas can stand average winter weather.
Are Violas poisonous to dogs?
Violas are not currently considered to be poisonous to dogs. As of May 2022, the Dogs Trust list of poisonous plants for dogs does not detail Violas. If you’re particularly worried or your dog is sensitive, growing Violas in hanging baskets out of your dog's way could be the answer.
What to do with Violas after flowering?
After your Viola plants have finished flowering, you can either treat them as an annual plant by taking them out, clearing the soil and composting or disposing of them, or as a perennial. If you want to treat them as a perennial but want to plant other seasonal plants in their place, take them out of the soil, tidy up long shoots and deadhead, then plant in a good peat-free compost filled pot and place in a pot out of direct hot sun. Keep them watered and you can then bring them back out and plant when you’re ready.
Key features of Violas
| Botanical Name | Viola spp. |
|---|---|
| Plant Type | Short-lived perennials or annuals (depending on conditions) |
| Family | Violaceae |
| Light Exposure | Full sun to partial shade, depending on variety and season |
| Soil Type | Moist, well-drained |
| Soil pH | Neutral to slight acidic |
| Flowering Time | Spring or autumn and some summer |
| Flower Colour | Dark purples, light through to deep lilacs, white, blue cream and yellows |


